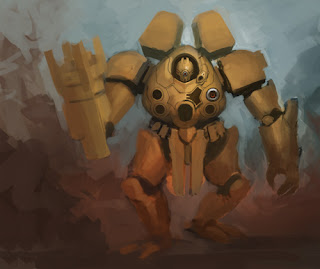
From the very sketchy thumbnail composition last time, now I am going to the stage of what we usually called under-painting. At this stage, I am just focusing on the BIG shapes or the big elements of the Mech Concept's geometry form (forget the tiny bitty little detail for now). Focus on the main shape of the object and the direction of the light. And if there is under lighting, look out for that too. Also keep in mind what kind of material the concept design composed of such as metal (*video tutorial sample: art tutorial knight metal armor), gold (art tutorial painting gold color), rubber and such.
As for this image, I am shooting for finished shiny yellow color coat over metal, similar to somewhat like a yellow sport car or something of that sort. But nothing is set in stone at this point, since now I have to overall shape paint...I can still tweak the material or some of the pose if I need to (thanks to digital painting).
**I'm still not sure about the machine gun hand direction. The way it's position is more like a soldier holding an machine gun rather than the actual Mecha would hold it's own machine gun hand.
Here is "painting Mecha step by step" so far

So here we go, painting big shapes...
This is zoom in, you can see scribble lines everywhere. :P
To be continued
Go to: Previous post #1 Mecha Robot step by step drawing
Drawing Software & Tools I used and recommended:
-Wacom Intuos3 6X8 Pen Tablet or Genius MousePen 6x8
Softwares:
-Gimp (Free Download)
-Adobe Photoshop CS4
New Drawing Video tutorials:
-Painting tutorial limited color palette 001
-Portrait painting from life step by step
-Drawing body muscle and abs shading and render
-Painting from life session step by step tutorial
-Manga tutorial drawing background
FEATURE TUTORIALS:
-Draw and Paint Women Body Tutorial I: Female Manga Fusion I
-Draw and Paint Women Body Tutorial II: Female Manga Fusion II
-Character Design Tutorial: Dark Valkyrie

0 comments:
Post a Comment