Drawing Girl Face (or I should say a woman or female facial figure, portrait in correct term.), Learn to draw Face, How to lesson step by step realistic face online lesson.
I feel like I did not try hard enough of the first face tutorial that I made so I make another one. I think it is a bit more effort since the first one I just make it really quick and easy.
BELOW is a step by step Still Images instruction on how to draw face.
This is not by any mean the ONLY way to draw face. This tutorial I present just show you how I personally and usually do it step by step. There is also a video instruction at the bottom of the post.
Here is the final drawing of a girl's face.

And some good tunes will also help with portrait or figure study. Usually for me these few songs below are great. You can press forward for the next song.
 2) Imagine a flat plane on front surface of an egg, think in three dimension, then draw two vertical lines along the edge of your imaginary plane. After that, draw a vertical line to split the flat plane in half from top to bottom. Then draw a horizontal line to divide the top and bottom distance in half. This horizontal line would be where humans eyes should be, they are usually right in the middle of the face horizontally. But most of the time we don't really see that because our hair deceives us.
 3) This step, I add two more horizontal line on top and bottom of the existing one. These line will help me indicate how tall should the eyes be in comparison to the rest of the face.
Another mark for the bottom of her nose, it is half way in between the first horizontal line and the bottom of her chin. And again in between the nose mark and the bottom of the chin half way should be where her mouth is.


5) Clean up the construction lines.
6) Now I add in eyebrows, the head of the eyebrow be about the same distance as the eye's corner horizontally, but the tail can be longer. Then I add a line to suggest her lower lip. 7) Now I draw some hair indication around the top of her skull. Some of it should cover top half of the skull or a bit less if she should pull her hair back. Then I put in an ear.
8) After all the frame work is done, now I can start to go in and tighten up some of the facial feature, I usually like to begin with her eyes.
9) Then I work my way down to her nose, lip and such, but nothing too dark, just light rendering to get all the indication of feature detail down first.

10) Now, I am just indicating where would I place my shadow areas if the light coming from in front of the face. At this stage, I render very lightly just so that I know where to place darkest dark on the final rendering.

11) Then I fill in her hair and render a little bit.
12) Since I think the overall face looks ok, now I am going to finalize the drawing. The usual areas where shadow hits the darkest dark are eye sockets, under the nose, under the upper lip, and above the chin (underneath the lower lip). The mid tone shadow are usually appeared on the side of her face and under her cheekbone (see as illustrate below).
13) Now I start to finalize the drawing from area to area, begin with her left eye. Then from here I use the existing value of this particular area to compare to the rest of the final rendering.
14) Then I go for the other eye, and compare value (always compare value for the rest of the drawing).

15) After I get both eyes, then I begin to work on the rest of the face start with the darkest value like around the nose, lips, and chin.
16) Now I have the whole face render, and I have to do the same for hair. (Darker hair has stronger contrast and hight light, and lighter hair usually have less contrast.)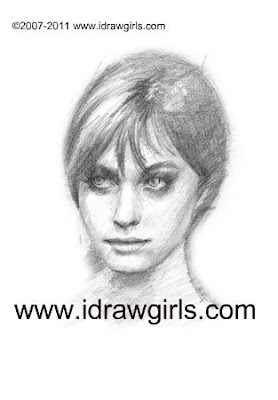
17) Now the whole face is done, all I have left to do is to finish up the background to make it a little more appealing. So I scribble in the background to make the white on her face pop out even more.
18) Finish
Here is a video instruction tutorial, how to draw face three quarter view:
Here is a final image drawing face

Order our PREMIUM Video Tutorials: Over 2-3 Hours of in dept Lessons!


More PREMIUM Video Tutorials and FREE DOWNLOAD!

Hope that helps.
Good luck and have fun with the tutorial.http://idrawgirls.com/how-to-draw-portraits.html
I feel like I did not try hard enough of the first face tutorial that I made so I make another one. I think it is a bit more effort since the first one I just make it really quick and easy.
BELOW is a step by step Still Images instruction on how to draw face.
This is not by any mean the ONLY way to draw face. This tutorial I present just show you how I personally and usually do it step by step. There is also a video instruction at the bottom of the post.
Here is the final drawing of a girl's face.
I am back with another tutorial this time I use graphite or pencil (3b to 5b are the range of blackness I personally like) . I am going to go very basic on this one from start to finish including a bit of pencil rendering.
And some good tunes will also help with portrait or figure study. Usually for me these few songs below are great. You can press forward for the next song.
1) I usually start with an egg shape drawing, very old school and traditional and it quick for me. On this one I am going to angle it a bit so the face will be 3/4 instead of the frontal shot. Always attach the neck and a bit of shoulder with the head when doing face, it gives you more of an illusion of this is part of a person. When you see an illusion of this is a part of a person, you will do a better job filling the rest in, instead of just an outline of egg shape or oval.
 2) Imagine a flat plane on front surface of an egg, think in three dimension, then draw two vertical lines along the edge of your imaginary plane. After that, draw a vertical line to split the flat plane in half from top to bottom. Then draw a horizontal line to divide the top and bottom distance in half. This horizontal line would be where humans eyes should be, they are usually right in the middle of the face horizontally. But most of the time we don't really see that because our hair deceives us.
 3) This step, I add two more horizontal line on top and bottom of the existing one. These line will help me indicate how tall should the eyes be in comparison to the rest of the face.
Another mark for the bottom of her nose, it is half way in between the first horizontal line and the bottom of her chin. And again in between the nose mark and the bottom of the chin half way should be where her mouth is.

4) Now, I draw the eyes, it should no be taller than the distance of the top and bottom horizontal lines that I added on to the first horizontal. I draw the corner of both eyes in relation to the first eye's indication line. Also the distance between the two eyes should equal one eye. So when you draw, imagine there is an invisible eye in between them. Then I begin to draw the nose, notice that I did not draw the whole nose. Why? Because in reality when you see the whole nose you tempt to draw the whole nose as you see. But if you paint a lot or draw a lot from life (especially in painting). You will notice, from squinting to find value in painting or rendering, that the value of the physical nose compare to the rest of the face is not at its darkest value to be able to put them in line drawing. If you were to draw a simple face which using black or darkest value to define the line drawing. The only part of the nose that should appear in line drawing should only be the bottom of the nose. Because that's where it casts the shadow as strong as a person eyes' line, eyelashes, and lips. (Make sense?) Then I finish this one off with the upper lips.
I also make the mark on the right side of the head where the top part of her ear should be (same level as eyes). Then another for ear lobe, it should be a bit above the nose mark.

5) Clean up the construction lines.

6) Now I add in eyebrows, the head of the eyebrow be about the same distance as the eye's corner horizontally, but the tail can be longer. Then I add a line to suggest her lower lip.
 7) Now I draw some hair indication around the top of her skull. Some of it should cover top half of the skull or a bit less if she should pull her hair back. Then I put in an ear.
8) After all the frame work is done, now I can start to go in and tighten up some of the facial feature, I usually like to begin with her eyes.

9) Then I work my way down to her nose, lip and such, but nothing too dark, just light rendering to get all the indication of feature detail down first.

10) Now, I am just indicating where would I place my shadow areas if the light coming from in front of the face. At this stage, I render very lightly just so that I know where to place darkest dark on the final rendering.

11) Then I fill in her hair and render a little bit.

12) Since I think the overall face looks ok, now I am going to finalize the drawing. The usual areas where shadow hits the darkest dark are eye sockets, under the nose, under the upper lip, and above the chin (underneath the lower lip). The mid tone shadow are usually appeared on the side of her face and under her cheekbone (see as illustrate below).

13) Now I start to finalize the drawing from area to area, begin with her left eye. Then from here I use the existing value of this particular area to compare to the rest of the final rendering.

14) Then I go for the other eye, and compare value (always compare value for the rest of the drawing).

15) After I get both eyes, then I begin to work on the rest of the face start with the darkest value like around the nose, lips, and chin.

16) Now I have the whole face render, and I have to do the same for hair. (Darker hair has stronger contrast and hight light, and lighter hair usually have less contrast.)

17) Now the whole face is done, all I have left to do is to finish up the background to make it a little more appealing. So I scribble in the background to make the white on her face pop out even more.
18) Finish
Here is a video instruction tutorial, how to draw face three quarter view:
Here is a final image drawing face
Order our PREMIUM Video Tutorials: Over 2-3 Hours of in dept Lessons!
More PREMIUM Video Tutorials and FREE DOWNLOAD!
Hope that helps.
Good luck and have fun with the tutorial.http://idrawgirls.com/how-to-draw-portraits.html


